

This tutorial demonstrates how to leverage AML-IP to parallelize the training of an Algebraic Machine Learning (AML) model within a distributed computing environment. AML-IP enables seamless data exchange between AML nodes, allowing users to create and manage clusters for concurrent training tasks.
The guide provides a step-by-step approach to setting up Main Nodes and Computing Nodes, distributing workload efficiently, and processing inference results. Additionally, it covers dataset loading, AML model training, and result handling. This tutorial serves as a foundation for implementing scalable AML training using AML-IP.
Background
AML-IP is a communications framework in charge of data exchange between Algebraic Machine Learning (AML) nodes through local or remote networks. It is designed to allow non-experts users to create and manage a cluster of AML nodes to exploit the distributed and concurrent learning capabilities of AML.
The purpose of this demo is to show how to parallelize the training of an AML model using AML-IP nodes in the context of the Workload Distribution Scenario.
The nodes involved in this scenario are Main Nodes and Computing Nodes. By implementing these two nodes, users can deploy as many nodes of each kind as desired and check the behavior of a simulated AML-IP network running.
Prerequisites
Before running this demo, ensure that AML-IP is correctly installed using one of the following installation methods:
Once AML-IP packages are installed and built, import the libraries using the following command.
source /AML-IP/install/setup.bash
Creating the Main Node
The Main Node is in charge of distributing the workload among the Computing Nodes.
Steps
- Create a file named main_node.py.
- Import the necessary libraries.
import json
import random
from amlip_py.node.AsyncMainNode import AsyncMainNode, SolutionListener
from amlip_py.types.JobDataType import JobDataType
from py_utils.wait.IntWaitHandler import IntWaitHandler
Note
The user should implement the loadDatasets module to best suit their needs. In a future section, we provide an example of how to load the MNIST dataset.
from loadDatasets import loadMNIST
- Create global variables
# Global variables
# Domain ID
DOMAIN_ID=2
# Holds the solution data from the model training
solution_data = None
# IntWaitHandler object to manage waiting for training job completion
waiter_job=IntWaitHandler(True)
- Implement the custom SolutionListener class
class CustomSolutionListener(SolutionListener):
def __init__(self):
super().__init__() # Call the parent constructor
def solution_received(
self,
solution,
task_id,
server_id):
global solution_data
if solution_data is None:
solution_data = json.loads(solution.to_string())
else:
solution_data.update(json.loads(solution.to_string()))
global waiter_job
# Each time a solution is received, the waiter_job is increased
waiter_job.increase()
- Create the main routine
def main():
"""Execute maine routine."""
# Create a waiter to avoid closing the main node before all jobs are finished
global waiter_job
# Initialize the waiter to 0
waiter_job.set_value(0)
global solution_data
solution_data = None
print('Starting Async Main Node Py execution. Creating Node...')
# Create the main node
main_node = AsyncMainNode(
'PyTestAsyncMainNode',
listener=CustomSolutionListener(),
domain=DOMAIN_ID)
# Load the dataset
training_images, training_labels = loadMNIST('MNIST').load_training()
# Number of parallel trainings to perform. The user can change this value to the desired number of parallel trainings
# The number of parallel trainings should be less than the number of computing nodes
nJobs = 2
for i in range(0, nJobs):
# Calculate data
# Zip the two lists together to maintain correspondence
zipped_data = list(zip(training_images.tolist(), training_labels.tolist()))
# Take a random sample of the data
num_items = len(zipped_data) // nJobs
sampled_zipped_data = random.sample(zipped_data, num_items)
# Unzip the sampled data back into separate lists
sampled_data_images, sampled_data_labels = zip(*sampled_zipped_data)
# Create job data
job_data =JobDataType('x: ' + json.dumps(sampled_data_images) + ' y: ' + json.dumps(sampled_data_labels))
# Send data to a remote Computing Node and waits for the solution
task_id = main_node.request_job_solution(job_data)
# Wait for all jobs to finish
waiter_job.wait_equal(nJobs)
print('All jobs finished. Stopping Async Main Node Py execution.')
- Run the main routine
if __name__ == '__main__':
main()
Creating the Computing Node
The Computing Node is in charge of processing the data and training the AML model.
Steps
- Create a file named computing_node.py.
- Import the necessary libraries.
import json
import signal
from amlip_py.node.AsyncComputingNode import AsyncComputingNode, JobReplier
from amlip_py.types.JobSolutionDataType import JobSolutionDataType
Note
The user should implement the train_alma function in the way that best suits their needs. In a future section, we provide an example of how to create this function in a basic form for demonstration purposes.
from AML_binary_classifier import train_alma
- Create global variables
# Global variables
# Domain ID
DOMAIN_ID=2
- Implement the custom JobReplier class
class CustomJobReplier(JobReplier):
def process_job(
self,
job,
task_id,
client_id):
data = job.to_string()
# Find the indices of 'x: ' and ' y: ' in the data string
x_index = data.find('x: ')
y_index = data.find(' y: ')
# Extract the substring between 'x: ' and ' y: ' to get the value of x
x = json.loads(data[x_index + len('x: '):y_index])
## Extract the substring between ' y: ' and : to get the value of y
y = json.loads(data[y_index + len(' y: '):])
print('Received job, calling train_alma')
model = train_alma(x, y, target_digit)
print('train_alma finished!')
solution = JobSolutionDataType(json.dumps(model))
return solution
- Create the main routine
def main():
"""Execute main routine."""
# Create node
print('Starting Async Computing Node Py execution. Creating Node...')
computing_node = AsyncComputingNode(
'PyTestAsyncComputingNode',
listener=CustomJobReplier(),
domain=DOMAIN_ID)
# Create job data
print(f'Node created: {computing_node.get_id()}. '
'Already processing jobs. Waiting SIGINT (C^)...')
# Start node
computing_node.run()
# Wait for signal
def handler(signum, frame):
pass
signal.signal(signal.SIGINT, handler)
signal.pause()
# Stop node
computing_node.stop()
print('Finishing Async Computing Node Py execution.')
- Run the main routine
if __name__ == '__main__':
main()
Loading the MNIST dataset
In this demo, we use the MNIST binary classifier, explained in the tutorial MNIST binary classifier with AML.
Therefore, we need to load the MNIST dataset to train the model. The dataset files can be found here. The files to use are:
- t10k-images-idx3-ubyte
- t10k-labels-idx1-ubyte
- train-images-idx3-ubyte
- train-labels-idx1-ubyte
Since the main node is in charge of sending the data to the computing nodes, the dataset must have a format that is easily manageable.
The following code snippets show how to load the MNIST dataset for our purpose. However, the user can implement the class in charge of loading the datasets in the way that best suits their needs, as long as the output format is compatible with the main node.
The following class is implemented in a file named loadDatasets.py.
Steps
Note
For loading the dataset, the following pip library has been installed:
pip install python-mnist
- Import the necessary libraries.
from mnist.loader import MNIST
import numpy as np
- Implement the loadMNIST class
class loadMNIST():
"""
Class to load the MNIST dataset.
"""
def __init__(
self,
dataset_path: str):
"""
:param dataset_path: Path where the dataset files are stored.
"""
# Initialize the class variables
self.training_images = []
self.training_labels = []
self.test_images = []
self.test_labels = []
self.dataset_path = dataset_path
def load_training(self):
"""
Load the training dataset.
:return: Training images as numpy array of shape (number of images, 784) and training labels as numpy array.
Make sure the labels are integers.
"""
# Initialize the MNIST loader object
mndata = MNIST(self.dataset_path)
# Load the training images and labels
training_images, training_labels = mndata.load_training()
# Convert the lists to numpy arrays
self.training_images = np.array(training_images)
self.training_labels = np.array(training_labels)
return self.training_images, self.training_labels
def load_testing(self):
"""
Load the testing dataset.
:return: Testing images as numpy array of shape (number of images, 784) and testing labels as numpy array.
Make sure the labels are integers.
"""
# Initialize the MNIST loader object
mndata = MNIST(self.dataset_path)
# Load the testing images and labels
images, labels = mndata.load_testing()
# Convert the lists to numpy arrays
self.test_labels = np.array(labels)
self.test_images = np.array(images)
return self.test_images, self.test_labels
This class will be called by the main node to load the MNIST dataset.
Creating the AML training function
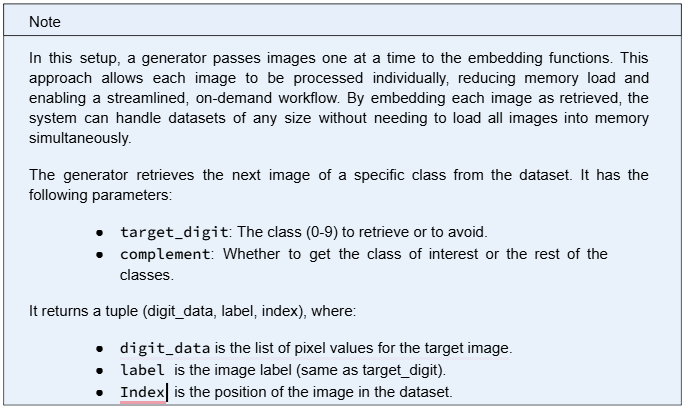
The steps explained in the MNIST binary classifier with AML tutorial can be followed to create the training function.
This function should have the data to train the model and the target class as parameters for creating the positive duplicates. The user can choose whether to include other hyperparameters.
This function should return the following:
- The constant manager that contains the embedding constants: model.cmanager.
- The cumulative model that has been built combining the atomizations across the whole training process: batchLearner.lastUnionModel.
In this example, the function is implemented in a file named AML_binary_classifier.py.
Processing the results
After the training process is complete, the computing node sends the model to the main node. Therefore, in order to be able to pack the model into the JobSolutionDataType, some processing is required.
This is an example of how to process the results. The user can adapt this function to their needs. The following functions are implemented in a file named AML_binary_classifier.py.
Steps
- Map constants to atoms
def load_aml_structures(constant_manager, lst_atoms):
"""
Load the AML structures.
:param constant_manager: The constant manager. The model.cmanager from the training function.
:param lst_atoms: The list of atoms. The batchLearner.lastUnionModel from the training function.
:return: A dictionary mapping constants to atoms.
"""
json_dict = {}
map_name_to_const = {}
for k, v in constant_manager.getReversedNameDictionary().items():
map_name_to_const[v] = int(k[1:])
json_dict['vTerm'] = list(map_name_to_const.values())
for int_const in constant_manager.getConstantSet():
list_atomization = []
if int_const in map_name_to_const.values():
for atom in lst_atoms:
map_atomization = {}
if int_const in atom.ucs:
bitarray_atom_to_list = list(atom.ucs)
atom_epoch = atom.epoch
print('atom_epoch:',atom_epoch)
atom_gen = atom.gen
map_atomization['atom_epoch'] = atom_epoch
map_atomization['atom_gen'] = atom_gen
map_atomization['atom_ucs'] =
bitarray_atom_to_list
list_atomization.append(map_atomization)
json_dict[int_const] = list_atomization
return json_dict
- Train the model and get the processed results
def train_alma(images, labels, target_digit=0):
"""
This function trains an Alma binary classifier using the given dataset.
:param images: The images in the dataset.
:param labels: The labels in the dataset.
:param target_digit: The target class to classify.
:return: A dictionary mapping constants to atoms.
"""
# Train the model
cmanager, lst_atoms = train_binary_classifier(images, labels, target_digit)
# Load the AML structures
atomization_dict = load_aml_structures(cmanager, lst_atoms)
return atomization_dict
Running the demo
To run the demo, follow these steps:
- Import the AML-IP libraries in all the terminal windows.
source /AML-IP/install/setup.bash
- In one terminal window, run the main node.
python3 main_node.py
- In other terminal windows, run as many computing nodes as the number of parallel trainings to perform.
python3 computing_node.py
When the training process is complete, the main node will receive the models from the computing nodes. After receiving all the models, the main node will stop executing.
By Denisa Alexandru from eProsima
MORE INFORMATION ABOUT ALMA:
For any questions please contact










 This project has received funding from the European Union’s Horizon 2020 research and innovation programme under grant agreement No 952091.